Map FTP as a Network Drive in Windows or Mac
Knowing how to map FTP as a network drive can be useful for efficiently transferring files and folders. Common methods include establishing a connection via your browser, adding servers on your computer, and using command lines.
You’ll learn about each of these methods today. Since CloudMounter means you don’t have to do any setup yourself, you may want to consider this as an alternative.
5 common ways of mapping FTP server as a network drive
While third-party software is more convenient, you can still use native methods if you don’t wish to install an extra app. However, you must ensure you have the correct information; otherwise, it won’t work. The general protocol is like this:
- After registering, look in your email inbox for the necessary access details.
- Connect by entering your login/password details, and then using the FTP server link and port.
Method 1. Map FTP drive on File Explorer
Mapping an FTP drive in Windows is the most commonly used method, but it’s also one of the hardest to implement.
Note: You need to ensure that you’ve set your folder properties to “Shared”. Go to Properties > Sharing > Advanced Sharing and tick “Share this folder”.
After setting your folder properties to Shared, follow the instructions listed below.
- Go to the left bar in Explorer and select Show more options > Map network drive. Alternatively, select the three-dot “See more” link in the top menu bar and click on “Map network drive”.
- Enter your FTP address or your network drive path in the wizard box. If you don’t know either of these, go to “Browse” and search for it.
- Tick “Reconnect at sign-in”. This will ensure that your computer always maps the files. If you use credentials from the networked computer to access the shared folder, choose “Connect using different credentials” and select “OK”.
- Enter your username and password when prompted.
- Find your network folder. Then, click “OK”; you should now see it in the File Explorer.
With these steps, you make a seamless connection to your remote server for easier file management. However, this way does not provide a reliable FTP connection for a few reasons:
- Even when a network location is displayed, you may see “Windows cannot access this folder”. This happens when your computer can’t communicate with an FTP server.
- When the FTP server is connected as a network location and not as a disk, file access may be restricted in programs, because they anticipate a drive letter.
Method 2. Mount FTP using the Windows command line
It’s also possible to mount an FTP as a drive in Windows with a command line. However, this is highly technical and requires a lot of manual work. You’ll have to enter commands for:
- uploading and downloading documents;
- opening folders.
If you still wish to mount an FTP server as a drive in Windows with this method, make sure you accurately follow the instructions below.
- Type your FTP command and hit the Enter key.
- Create your command ftp_hostname.
- Add your username. Alternatively, if you wish to sign in without showing your username, enter Anonymous.
- Enter your password (unless you wish to be anonymous, in which case you shouldn’t type anything in the password field).
- Hit the Enter key.
You can also automate your FTP server connection. Doing so will require you to enter the right scripts and commands. Mapping Network Drives via Microsoft Powershell is possible with this command:
New-PSDrive -Name x -PSProvider FileSystem -Root \\server\share -Persist
Method 3. FTP connection via a web browser
Another option is to connect via your browser, but you should consider an alternative method. It’s not particularly secure, and for bigger amounts of data, you may find it more difficult to transfer your files. However, if you wish to set up a connection via your browser, you can follow these steps.
- Enter your details in your browser’s URL bar using this template: ftp://login:password@server ip_address.
- Hit the “Enter key”.
- A window will then appear and ask you to enter your login details, submit your username/password, and press “Login”.
- Begin working with your files when the root folder shows up.
Note: If you must set up an FTP connection via your browser, make sure you’re on a private and secure internet connection.
Method 4. Add an FTP server as a mapped drive on Mac
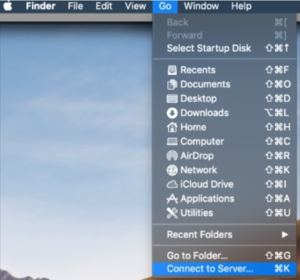
It’s also possible to mount FTP as a drive on your Mac. You’ll need to use Finder for this, and the steps you should follow are listed below.
1 .Open Finder.
2. Select Go > Connect to Server. Alternatively, enter the “Command + K” shortcut.
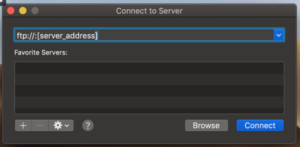
3. Enter your server address in this format: ftp://your-ftp-server-address, and click on the “+” button.
4. Select “Connect”.
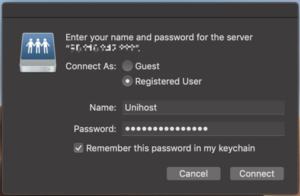
5. You’ll then have to enter your username and password. Do this and select “Connect”. This will take you to your macOS FTP host. You may also want to save your login details in your Keychain or Apple Passwords to easily find these in the future.
6. Go to “Locations” to find and access your server like any other folder on your Mac.
Note: Finder has limited support even for read-only, for example, plain FTP. And if you have FTPS or SFTP, you can’t use it. Plus, if you use FTP all the time, you have to mount it every time in Finder manually, but CloudMounter can mount it automatically. Therefore, to fully work with files from a remote server on a Mac, you should consider using a third-party service, such as an FTP client.
Method 5. Access the mounted drive due to the FTP client
FTP client is a more convenient option for regular FTP server access. It’s more reliable than manually-configured native methods in most cases. You get each of the following:
- stable server connections;
- extra features such as SSH file transfer protocols;
- easy-to-navigate interfaces.
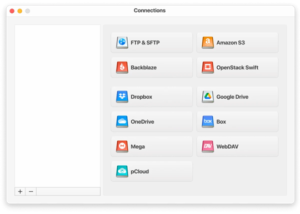
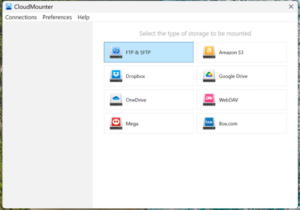
CloudMounter is an ideal FTP client if none of the native versions met your requirements. Setup is pretty straightforward, and you only need to do this once for your servers. Let’s look at how to do so.
How to map FTP as a disk with CloudMounter
Here’s how to mount FTP as a disc using the application:
1.Download and install the program for macOS or Windows on your computer.
2. Launch your app and choose a preferred connection (e.g. SFTP & FTP).
3. Enter these details:
- server name, address, and port;
- connection type (FTP, FTP with TLS/SSL, FTP with Implicit SSL);
- login and password.
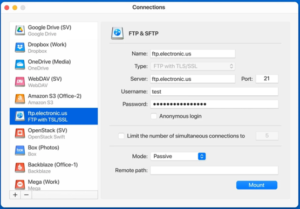
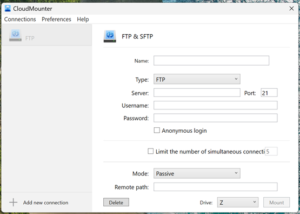
4. Select “Mount”.
5. Wait for the server to connect. You should now be able to find and work with your remote files through Finder or File Explorer.
How else is CloudMounter useful
This desktop app is a great tool for quickly mapping FTP servers, but it has numerous other advantages. Here are some of the other reasons to use it:
- Bring your reallocated files from multiple accounts and cloud platforms within a single interface.
- Free up cloud and local storage space by moving files elsewhere.
- It’s available on Windows and macOS, meaning you can use it even if you switch operating systems.
- Client-side encryption for additional security, compared to manual options which can be less secure.
- Offline working with remote files on macOS, you can stay regardless of the Internet connection.
Conclusion
Mapping FTP servers can seem daunting if you have limited technical expertise, but it doesn’t have to be challenging. Integrating third-party tools to do most of the work for you will help you get up and running in less time than if you were to do so yourself. Moreover, the connection will be more stable and secure. It’s still possible to manually set up your servers, but doing so is sometimes frustrating, and you may need to re-establish your connection.